Today, We brng you this awesome Tutorial which lets you add Fancy Scrolling Recent Posts Widget on your blogger blog.
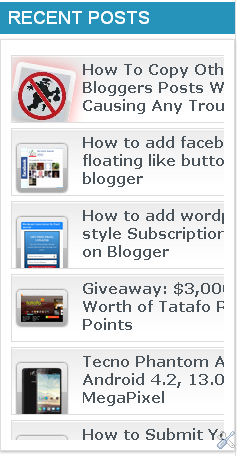
below is how this will look like when you implement it on your blog.
Follow the below steps to implement this on your blogger blog…
1. Goto your blogger dashboard
2. Select the blog you want to add it to and navigate to ‘Templates’ Click on EDIT HTML
3. Search For ]]></b:skin> . Add the Below Code Just Above It
#ETJ-widget {
overflow: hidden;
margin-top: 5px;
padding: 0px 0px;
height: 385px;
}
#ETJ-widget ul {
width: 295px;
overflow: hidden;
list-style-type: none;
padding: 0px 0px;
margin: 0px 0px;
}
#ETJ-widget li {
width: 282px;
padding: 5px 5px;
margin: 0px 0px 5px 0px;
list-style-type: none;
float: none;
height: 80px;
overflow: hidden;
background: #fff url(http://4.bp.blogspot.com/-n-c0E1EolLQ/UNgwiGzaTEI/AAAAAAAAI08/QlG8dKfnY0g/s1600/NewBloggerTips.com-post.jpg) repeat-x;
border: 1px solid #ddd;
}
#ETJ-widget li a {
text-decoration: none;
color: #4B545B;
font-size: 15px;
height: 18px;
overflow: hidden;
margin: 0px 0px;
padding: 0px 0px 2px 0px;
}
#ETJ-widget img {
float: left;
margin-top: 10px;
margin-right: 15px;
background: #EFEFEF;
border: 0;
}
#ETJ-widget img {
-webkit-transition: all 0.5s ease;
-moz-transition: all 0.5s ease;
transition: all 0.5s ease;
padding: 4px;
background: #eee;
background: -webkit-gradient(linear, left top, left bottom, from(#eee), color-stop(0.5, #ddd), color-stop(0.5, #c0c0c0), to(#aaa));
background: -moz-linear-gradient(top, #eee, #ddd 50%, #c0c0c0 50%, #aaa);
-webkit-border-radius: 4px;
-moz-border-radius: 4px;
border-radius: 4px;
-webkit-box-shadow: 0 0 3px rgba(0,0,0,.7);
-moz-box-shadow: 0 0 3px rgba(0,0,0,.7);
box-shadow: 0 0 3px rgba(0,0,0,.7);
}
#ETJ-widget img:hover {
-moz-transform: scale(1.2) rotate(-350deg);
-webkit-transform: scale(1.2) rotate(-350deg);
-o-transform: scale(1.2) rotate(-350deg);
-ms-transform: scale(1.2) rotate(-350deg);
transform: scale(1.2) rotate(-350deg);
-webkit-box-shadow: 0 0 20px rgba(255,0,0,.4), inset 0 0 20px rgba(255,255,255,1);
-moz-box-shadow: 0 0 20px rgba(255,0,0,.4), inset 0 0 20px rgba(255,255,255,1);
box-shadow: 0 0 20px rgba(255,0,0,.4), inset 0 0 20px rgba(255,255,255,1);
}
.spydate {
overflow: hidden;
font-size: 10px;
color: #0284C2;
padding: 2px 0px;
margin: 1px 0px 0px 0px;
height: 15px;
font-family: Tahoma,Arial,verdana, sans-serif;
}
.spycomment {
overflow: hidden;
font-family: Tahoma,Arial,verdana, sans-serif;
font-size: 10px;
color: #262B2F;
padding: 0px 0px;
margin: 0px 0px;
}
#ig-subscription-optin input[type=”submit”]:hover {color: #FFA5A5;}
4. Now Goto Layout > Add Gadget > HTML/Javascript Then Add the below code
<script language=’JavaScript’>
imgr = new Array();
imgr[0] = “http://1.bp.blogspot.com/-_Ka22NXTcw8/UNROKxLh64I/AAAAAAAAIxQ/na4pvgRt9Mw/s1600/No+Image+1.gif”;
imgr[1] = “http://1.bp.blogspot.com/-_Ka22NXTcw8/UNROKxLh64I/AAAAAAAAIxQ/na4pvgRt9Mw/s1600/No+Image+1.gif”;
imgr[2] = “http://1.bp.blogspot.com/-_Ka22NXTcw8/UNROKxLh64I/AAAAAAAAIxQ/na4pvgRt9Mw/s1600/No+Image+1.gif”;
imgr[3] = “http://1.bp.blogspot.com/-_Ka22NXTcw8/UNROKxLh64I/AAAAAAAAIxQ/na4pvgRt9Mw/s1600/No+Image+1.gif”;
imgr[4] = “http://1.bp.blogspot.com/-_Ka22NXTcw8/UNROKxLh64I/AAAAAAAAIxQ/na4pvgRt9Mw/s1600/No+Image+1.gif”;
showRandomImg = true;
boxwidth = 255;
cellspacing = 6;
borderColor = “#232c35”;
bgTD = “#000000”;
thumbwidth = 50;
thumbheight = 50;
fntsize = 15;
acolor = “#666”;
aBold = true;
icon = ” “;
text = “comments”;
showPostDate = true;
summaryPost = 40;
summaryFontsize = 10;
summaryColor = “#666”;
icon2 = ” “;
numposts = 10;
home_page = “http://etechvilla.com“;
limitspy=10;
intervalspy=4000;
</script>
<div id=”ETJ-widget”>
<script src=’https://dl.dropbox.com/s/rj19j5n1ng0jqd9/Recent%20Posts.js’ type=’text/javascript’></script>
</div>
<div id=”EtecchJournal” style=”background: #EBEBEB;border: 1px solid #CCC;border-top: 1px solid white;padding: 1px 8px 1px 3px;text-align: right;border-image: initial;font-size:10px;font-family: “arial”,”helvetica”,sans-serif;”> <span class=”author-credit” style=”font-family: Arial, Helvetica, sans-serif;”><a href=”http://etechvilla.com”>Free Blogger Widget</a></span></div></div>
5. Save and preview
#Customization: Change www.etechvilla.com In the last code above to your Blog URL
#Conclusion: Over To You Boss!!! What do you think About this Post?? Do you have further clearifications? Feedbacks? Suggestions? Or Inquiry? Why Not Use The comment Box To Communicate With Us? We will be Happy If you Do.