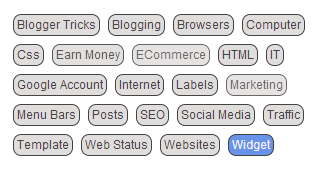
This Tutorial will take nothing More than 5 Mins to Implement and you will be amazed how simple and beautiful this will make your blog look.
Just follow the below steps any you will add this Label to your blog. Just take a look at a screenshot of it below:
Step 1:
Goto Your Blogger Dashboard.
Step 2.
Locate The Blog you want to apply this beautiful CSS Label To.
Step 3.
Locate Template >> EDIT HTML
Step 4.
Put your Mouse on the Blogger HTML Editor and Press
Step 5.
Type
Step 6.
Just Above The code above, Put the CSS Code Below:
#Label1 a{
position:relative !important;
margin:4px;
padding:3px;
float:left;
white-space:nowrap;
background:#E0DDDD;
color:#454242;
border:1px solid #454242;
-moz-border-radius:8px;
-webkit-border-radius:8px;
border-radius:8px;
font-family: “Arial”,”Helvetica”,sans-serif;
font-size:12px;
text-decoration:none;
text-transform:capitalize;
-moz-transition:all .6s linear ;
-webkit-transition:all .6s linear ;
-o-transition:all .6s linear ;
transition:all .6s linear ;
}
#Label1 a:hover {
background:#6992E9;
color:#F3F4F8;
-moz-transition:all .3s ease ;
-webkit-transition:all .3s ease ;
-o-transition:all .3s ease ;
transition:all .3s ease ;
}
Step 7. Save Template.
Step 8. Now install “Label” widget and activate “Cloud” display mode. If You already Have a Label in your blog, Edit It and Change Its display to “Cloud”
#Conclusion: Over To You Boss!!! What do you think About this Post?? Do you have further clarifications? Feedback? Suggestions? Or Inquiry? Why Not Use The comment Box To Communicate With Us? We will be Happy If you Do.


