Since facebook introducd the comment box for bloggers, it has helped increase the traffic of most bloggers and that is probably the reason you are here to learn how to insert the wordpress facebook comment box to your blog.
This post is a continuation of the Blogger version I wrote on How to Add Facebook Comments Box form to Blogger Blogs
How to add facebook comment box to wordpress blog
Step 1: Create A Facebook App
The first thing you need to do is visit the Facebook Application page and click on ‘Create New App’.
Insert a name e.g. YourSite.com Comments. Facebook will provide you with and App ID/API Key and App secret key.
Step 2: Customise Your Facebook Comment Area
Next thing you should do is go to the Facebook Comments code. Don’t worry about the ‘URL to comment on’ field for the moment. You simply need to choose how many comments you want per page, the width of your comment area and whether you prefer the light or dark scheme.
Step 3: Add Facebook Code To Your Header.php Template
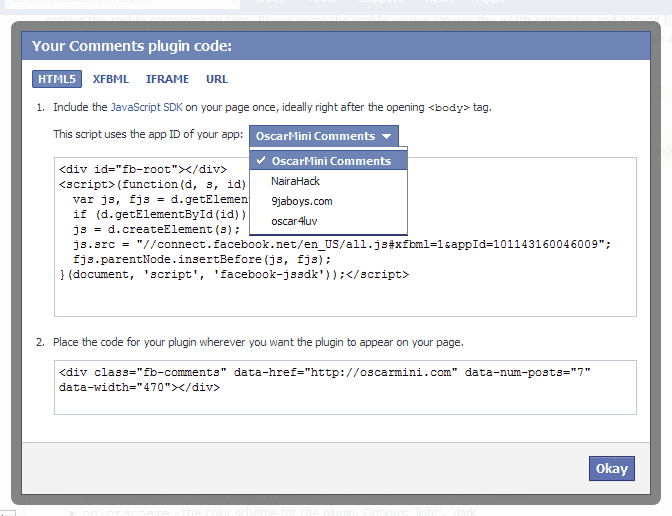
Click on the ‘Get Code’ button, then seleect HTML5 version.
If you have created more than one application on Facebook, make sure you select the appropriate application for your comments so that the correct ID is generated in the code.

This is what the code should look like:
 <div id="fb-root"></div>
 <script>(function(d, s, id) {
 var js, fjs = d.getElementsByTagName(s)[0];
 if (d.getElementById(id)) return;
 js = d.createElement(s); js.id = id;
 js.src = "//connect.facebook.net/en_GB/all.js#xfbml=1&appId=YOURAPPLICATIONID";
 fjs.parentNode.insertBefore(js, fjs);
 }(document, 'script', 'facebook-jssdk'));</script>
Now open the header.php file of your wordpress theme and add this code just below the body tag e.g. directly after <body>. After you have added the code, save the file.
Step 4: Add Facebook Code To Your Comments.php Template
The second piece of code that Facebook provides looks something like this (it depends on how many posts you specified per page and the widget of the comment area):
<div data-href="http://example.com" data-num-posts="2" data-width="500"></div>
The default code that Facebook provides links to a static URL therefore we need to modify the code so that the current page is linked (i.e. the permalink). To do this, all you need to do is replace data-href=”http://example.com” with data-href=”<?php the_permalink() ?>”.
Your code should now look something like:
<div data-href="<?php the_permalink() ?>" data-num-posts="2" data-width="500"></div>
To add this to your comment area, all you need to do is add the above code to your comments.php template. Where you should add this code depends on how your comments.php template is coded and whether you want Facebook comments to appear above or below WordPress comments.
If you have followed these steps correctly, you should now see Facebook comments either above or below your regular WordPress comments.
And that’s it. You’ve successfully added Facebook Comment Box to your WordPress Blog.


