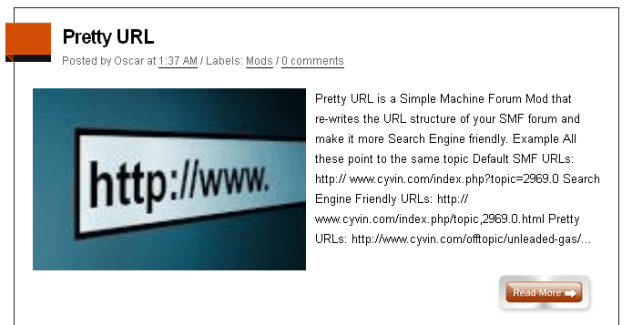
Adding the Read More button and Excerpts to your blogger blog makes your blog look neat and organized. On default, when you visit any blogger blog, all posts are displayed on the home page in full, but with this tip I’m about to show you, you can add excerpts (a summary of the post) with a Read More Link to the main post just like the image shown below.

Follow this guide and you’ll have your excerpts, thumbnails and Read More button link running in less than 5 minutes.
How to Add Read More, Thumbnails and Excerpts in blogger
- Log in to your blogger dashboard, now click on the drop down button next to the blog you wish to add this function, then click on Template
- Now click on Edit HTML >> Proceed. Now tick the Expand Widget templates checkbox
- Click Ctrl + F and search for </head> , now immediately before this paste the code below
summary_img = 350;
img_thumb_height = 200;
img_thumb_width = 300;
</script>
<script type=’text/javascript’>
//<![CDATA[
function removeHtmlTag(strx,chop){
if(strx.indexOf(“<“)!=-1)
{
var s = strx.split(“<“);
for(var i=0;i<s.length;i++){
if(s[i].indexOf(“>”)!=-1){
s[i] = s[i].substring(s[i].indexOf(“>”)+1,s[i].length);
}
}
strx = s.join(“”);
}
chop = (chop < strx.length-1) ? chop : strx.length-2;
while(strx.charAt(chop-1)!=’ ‘ && strx.indexOf(‘ ‘,chop)!=-1) chop++;
strx = strx.substring(0,chop-1);
return strx+’…’;
}
function createSummaryAndThumb(pID){
var div = document.getElementById(pID);
var imgtag = “”;
var img = div.getElementsByTagName(“img”);
var summ = summary_noimg;
if(img.length>=1) {
imgtag = ‘<span style=”float:left; padding:0px 10px 5px 0px;”><img src=”‘+img[0].src+'” width=”‘+img_thumb_width+’px” height=”‘+img_thumb_height+’px”/></span>’;
summ = summary_img;
}
var summary = imgtag + ‘<div>’ + removeHtmlTag(div.innerHTML,summ) + ‘</div>’;
div.innerHTML = summary;
}
//]]>
</script>
- Now press Ctrl + F and search for <data:post.body/> , now replace with the code below
<b:else/>
<b:if cond=’data:blog.pageType != “item”‘>
<div expr:id='”summary” + data:post.id’><data:post.body/></div>
<script type=’text/javascript’>createSummaryAndThumb(“summary<data:post.id/>”);
</script> <span class=’rmlink’ style=’float:right;padding-top:20px;’><a expr:href=’data:post.url’><img alt=’Read More’ src=’http://4.bp.blogspot.com/-sLjgxDHhjKg/UJQp9DCXSXI/AAAAAAAAAIg/UxvPNI4klq8/s1600/brown.gif’/></a></span>
</b:if>
<b:if cond=’data:blog.pageType == “item”‘><data:post.body/></b:if>
</b:if>
- Now click on Save Template, and view your blog. That’s it.
Hope you enjoyed this blogger tip. If you encounter any problem on this, feel free to use the comment box to ask your questions.


3 Comments
Thanks for the post, but bro the thing not working for me. what do i do… done everytin you said but yet not working
Really Samuel,
Sorry for the late reply. I recently used this on one of my new blogger blogs. I’ll check the javascript if it’s still functioning and let you know about that.
Hi Kelechi,
I just checked this and it still works. I guess you missed the
Thanks.