As a web designer/developer, that moment always comes when you have to upload your clients design to the internet, probably to a purchased hosting server so users can access your clients website from the internet. This can be easily done when you designed the webpages in just html (probably + CSS) files, but it could be a little tricky trying to move a website designed using the WordPress CMS on your localhost WAMP server.
Here is a run down on the various stages we are going to go through in order to successfully move our wordpress site or blog to the internet from WAMP.
Changing URL
We need to change the URL of our wordpress site from wordpress dashboard so that after moving our site, it would successfully load when we visit the domain we purchased from the webhost. Follow the below steps to achieve that.
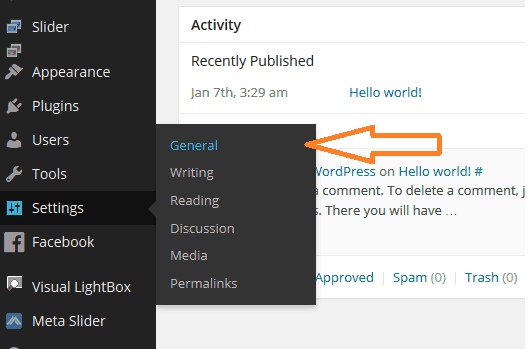
1. Once logged into your wordpress dashboard which is loaded from localhost WAMP server on your PC, click on Setting > General from the left sidebar.
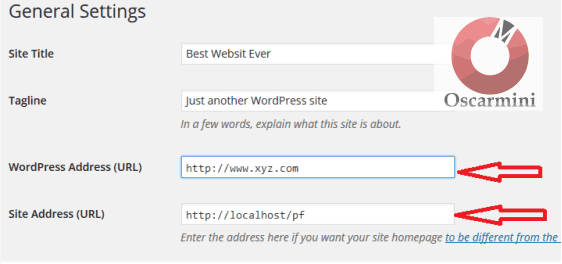
2. On the page that loads up, change the WordPress Address and Site Address you can find to your already purchased domain. In my case, i’m changing http://localhost/pf to http://www.xyz.com . Then Click on Save Changes at the bottom of the page.
After you must have done this, your site would no longer be accessible via the former URL on your PC (Might load up, but not correctly with the theme and other settings). Don’t worry, that’s what we need.
Backing up and Restoring the WordPress Files
Now it’s time to move your site files to your web server, firstly you have to compress your wordpress site into an archive so you could easily upload it to your servers.
3. You should know your way around your WAMP installation folder. I installed my wordpress site in D:\wamp\www\pf .
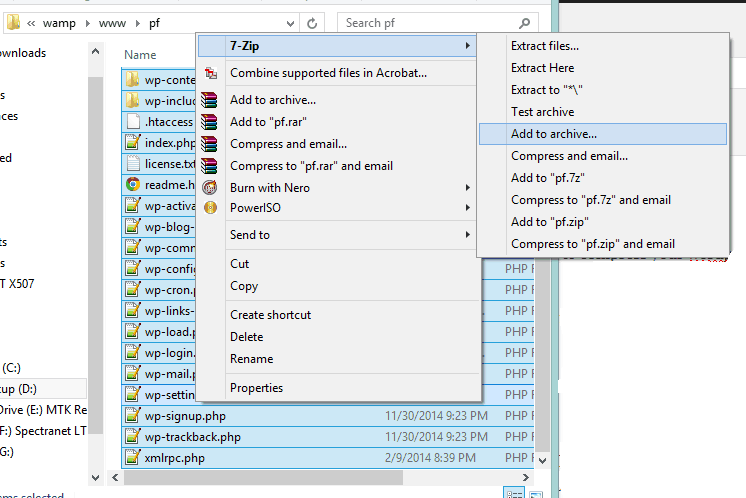
Go to your wordpress installation folder, select all files and compress to an archive using 7zip, preferably a .tar file.
Uploading to Server
4. Create an FTP account on your webhost cPanel server and upload the file to the domain directory. If the domain is not an addon domain, you must likely would have to upload the compressed file to public_html directory.
Note: Make sure you delete all files in this directory. Then extract or uncompress your uploaded file here by Right clicking on your upload and click on Extract from cPanel’s File Manager.
- Must Read: How to Create an FTP account on cPanel.
- How To Upload Files to Web Host server via FTP using Filezilla.
Backing Up and Restoring the WordPress Database
Now it’s time to backup your blog’s database. I’m assuming you know the database name you installed your wordpress site to on your pc. Follow the below steps to grab a copy of the database.
5. Visit http://localhost/phpmyadmin on your browser to access phpMyAdmin. Then select the wordpress’ database from the left sidebar.
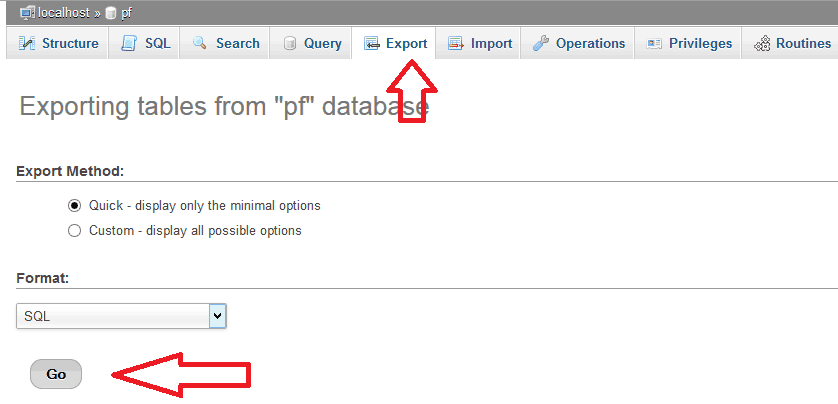
6. Click on the Export tab, then click on Go to export the database to your pc.
Creating and Importing the Database into your webserver
7. Now log in to your cPanel’s dashboard, create a new MySQL database, User and connect the user to the database.
8. In your web-server’s cPanel, click on phpMyAdmin, and locate the new database you just created from the left sidebar, click on Import, click on browse your computer to select the sql file you backedup earlier, then click on Go at the bottom of the page to initiate the upload process.
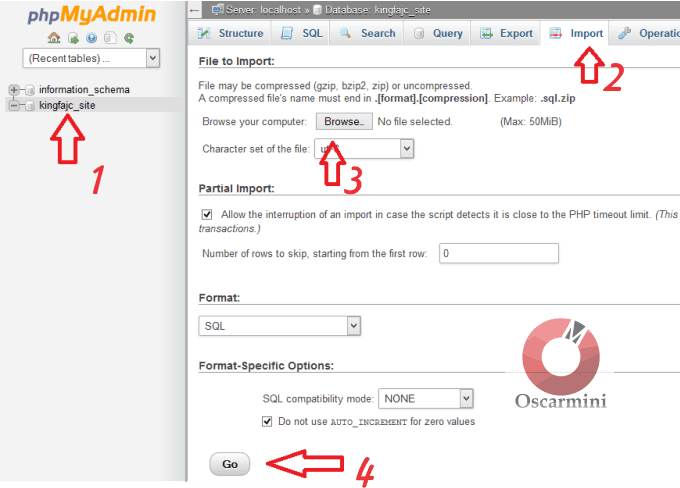
9. Here’s what you get after a successful database upload. Now it’s time to link the already uploaded wordpress files to this MySQL database.

Connecting WordPress To New Database
10. Launch File Manager via cPanel, and navigate to the directory where you uploaded your wordpress file earlier (most likely the public_html path if the domain isn’t an addon to your hosting plan).
11. Edit the wp-config.php file and replace the database name, database user and password with the details you created while setting up the fresh database, then save.
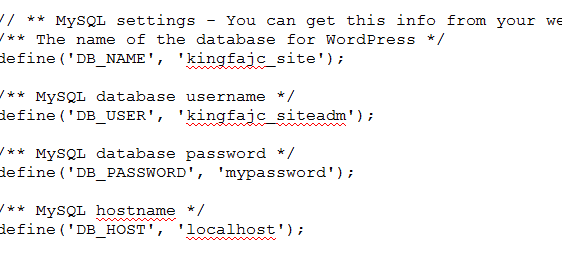
Hurray! Load your live domain URL and your website should be live over the internet.
Troubleshooting WordPress Problems
After you’ve completed your transfer, you can now try to access the website on the new domain. While the instructions above are complete, it could be possible that there is some error which causes the WordPress blank page problem. You can check out this article on CollectiveRay to troubleshoot and fix such problems.
If you find any difficulties in the process, feel free to let me know using the comment section below.


8 Comments
Nice tutorial oscar
Thanks a ton for the compliments. 🙂
Good delivery! Your tutorials are luring me to move my blog from Blogger to WordPress. Frank, do you provide this service?
Hi,
Sure I do. You could hit me up if you need the service. BTW, thanks for finding time to read through. 🙂
Hi.
I followed step by step. Guess I missed something. This is what I got after loading my url:
Index of /
.ftpquota
I look forward to your assistance.
Thanks.
Hi Frank, do you offer Blogger to WordPress migration service?
Hi,
Sure I do.
I hope to move to WordPress someday considering the recommendations of top blogger, bookmarked